
Windows:ファイルとフォルダーを隠す
Windowsなどのマルチユーザーシステムでは、他のユーザーがフォルダーやファイルにアクセスできないようにするために、フォルダーやファイルを非表示にする必要がある場合があります。
ファイルとフォルダーをすばやく非表示にする
最も簡単な解決策は、いわゆる隠し属性を設定することです。
- これを行うには、関連するファイルまたはフォルダーを右クリックし、「プロパティ」に移動します。
- [非表示]の横にあるチェックボックスをオンにして、[適用]で確定します。
特定のユーザーからファイルとフォルダーを安全に隠す
残念ながら、ファイルエクスプローラーは隠しファイルまたは隠しフォルダーを表示する可能性を提供するため、上記の方法はどのユーザーでも簡単にバイパスできます。 次の手順を使用すると、アクセスをより効果的に規制できます。 仕組みは次のとおりです。
- ファイルとフォルダを移動して、非表示にする集合フォルダにアクセスし、アクセスを制限できます。
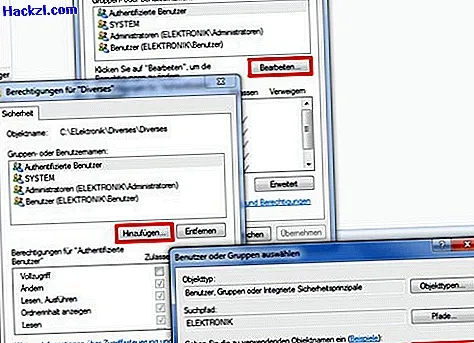
- 次に、フォルダを右クリックして、コンテキストメニューから[プロパティ]オプションを選択します。
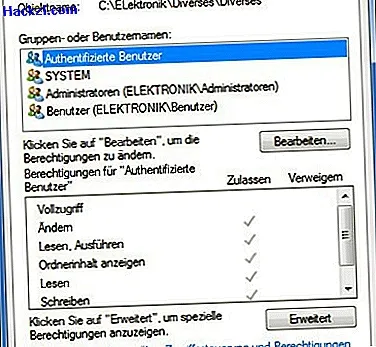
- [セキュリティ]タブの[グループとユーザー名]の下にユーザーグループが表示されます。 特定の権限をクリックすると、下のボックスでユーザーがどの権限を持っているかを確認できます。
- 権限を制限する新しいユーザーを作成するか、既存のユーザーを取り消すことができます。
アクセスを制限するユーザーを追加します
新しいユーザーを決定する場合は、最初に次の手順を実行します。
- [編集]ボタンをクリックしてから、[追加]ボタンをクリックします。
- [ユーザーまたはグループの選択]ウィンドウで、ユーザーの名前(「Sven」など)を入力し、[名前の確認]ボタンをクリックしてから[OK]ボタンをクリックします。
フォルダーとファイルに対するユーザーの権限を取り消します
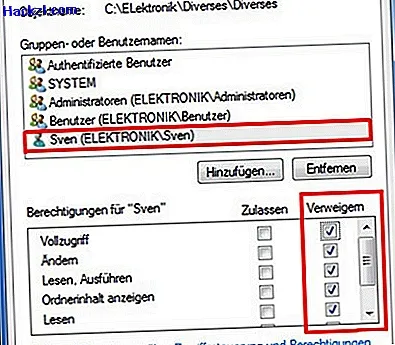
- ユーザー「Sven」は、ポイント1からすでに知っているリストに含まれています。 ユーザーの名前エントリをクリックするだけで、ユーザーを「Sven」とマークします。
- 下のウィンドウ「 'Sven'の認証」で、現在の認証設定を確認できます。 Svenからディレクトリへのすべてのアクセスを削除するには、[フルアクセス]チェックボックスの[拒否]列をクリックし、[適用]ボタンをクリックして設定を適用します。
- 他のユーザーのアクセスを取り消すには、[追加]ボタンをもう一度クリックして、手順2からやり直します。
- リストにユーザーまたはグループを追加しない場合は、[OK]ボタンをクリックします。
Windowsでの権利の割り当ては、この小さな例に示されているものよりもはるかに複雑であることに注意してください。 管理者権限を持つユーザーは、上記で指定した設定を元に戻すことができます-ただし、これはすべての設定に適用されます。 たとえば、小規模な企業ネットワークで制限付き権利の割り当てを設定する場合、このトピックをより集中的に扱うことが重要です。
Windows 7でパスワードでフォルダーを保護する方法については、こちらをご覧ください。